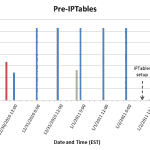
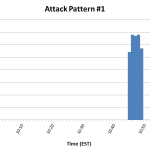
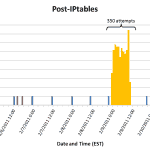
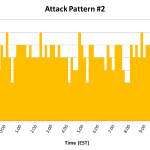
I have previously written a bit about using IPTables to limit brute-force attacks. For the past month, that system has been working quite well. The typical attack pattern resembled that in [graph 1, graph2]. A few days ago, however, an attack was implemented which ‘fell under the radar’, so to speak – instead of being a short-lived, high volume (60/min for 5 min) attack, this one was a slow and prolonged attack (1/2 min for 11 hrs) [graph 3, graph 4].
Improvements
Due to this, I have decided to augment my IPTables ruleset somewhat. There are a couple of points I found lacking in the previous revision. Firstly, repeat offenders did not have any extra consequences – whether you attacked for the first time or the tenth time, you were treated equally. Secondly, a slow attack was not effectively dealt with. Thirdly, the nature of the attack (quick vs slow) was not considered in the consequence. Finally, I wasn’t that pleased with the logging implementation – the log file was not exclusive, and no log rotation was setup. All of the above are addressed in this revision.
I decided on the following setting of bans:
| 5 connects/min | 10 connects /10 min | 30 connects/hr | |
| Offence #1 | 30 min | 2 hrs | 1 day |
| Offence #2 | 2 hrs | 1 day | 1 wk |
| Offence #3 | 1 day | 1 wk | 1 mo |
| Offence #4 | 1 wk | 1 mo | 1 mo |
| Offence #5+ | 1 mo | 1 mo | 1 mo |
Note: there is a big difference between 10 connects/10 minutes and 1 connect/min – if I was to open an SSH client and FTP client in succession, I would have 2 connections in under a minute and would trigger 1 connect/min – however, it would not trigger 10 connects/10 minutes (which reasonably, should not be occurring from a single user for these specific services).
Prerequisite
One further point, before getting to the rules – the recent module, by default, will only log 20 connections. If you attempt to add a rule with a hitcount exceeding 20 to iptables, an error will be thrown. The error (below) can be viewed by running dmesg:
xt_recent: hitcount (31) is larger than packets to be remembered (20)
Since I wish to use 31, it is necessary to modify the options for the module. To do so, modify (or create) /etc/modprobe.d/options, adding (or modifying):
options xt_recent ip_pkt_list_tot=35
(Note: xt_recent is the name of the module – on some systems, the module is named ipt_recent.)
The Rules
The following are the rules I have implemented. If you are adventurous, you can integrate these directly into /etc/sysconfig/iptables. Otherwise, it is probably better to add them individually to iptables (for the most part, just add iptables before each line – except the new chains, which need iptables -N added before them, and when done, view with iptables -S and save with iptables-save > /etc/sysconfig/iptables (backup first!)). Ensure you have a contingency in place if you get locked out of your system (either a cron task flushing iptables (iptables -F) or a ‘backdoor’ of some sort.
(As before, these are modifications, not a complete rule set)
:ATTACKED1 - [0:0]
:ATTACKED2 - [0:0]
:ATTACKED3 - [0:0]
:ATTK_CHECK - [0:0]
:BAN1 - [0:0]
:BAN2 - [0:0]
:BAN3 - [0:0]
:BAN4 - [0:0]
:BAN5 - [0:0]

#Unrelated, pre-existing ACCEPTs ...

-A INPUT -i lo -j ACCEPT
-A INPUT -m state --state RELATED,ESTABLISHED -j ACCEPT

-A INPUT -p tcp -m multiport --dports 21,22,25,110,143 -m recent --rcheck --seconds 62208000 --name BANNED5 --rsource -j DROP
-A INPUT -p tcp -m multiport --dports 21,22,25,110,143 -m recent --rcheck --seconds 14515200 --name BANNED4 --rsource -j DROP
-A INPUT -p tcp -m multiport --dports 21,22,25,110,143 -m recent --update --seconds 86400 --name BANNED3 --rsource -j DROP
-A INPUT -p tcp -m multiport --dports 21,22,25,110,143 -m recent --update --seconds 7200 --name BANNED2 --rsource -j DROP
-A INPUT -p tcp -m multiport --dports 21,22,25,110,143 -m recent --update --seconds 1800 --name BANNED1 --rsource -j DROP
-A INPUT -p tcp -m multiport --dports 21,22,25,110,143 -m state --state NEW -j ATTK_CHECK

#OTHER PRE-EXISTING RULES
#...

-A ATTACKED1 -m recent --rcheck --name BANNED4 --rsource -j BAN5
-A ATTACKED1 -m recent --rcheck --name BANNED3 --rsource -j BAN4
-A ATTACKED1 -m recent --rcheck --name BANNED2 --rsource -j BAN3
-A ATTACKED1 -m recent --rcheck --name BANNED1 --rsource -j BAN2
-A ATTACKED1 -j BAN1

-A ATTACKED2 -m recent --rcheck --name BANNED4 --rsource -j BAN5
-A ATTACKED2 -m recent --rcheck --name BANNED3 --rsource -j BAN4
-A ATTACKED2 -m recent --rcheck --name BANNED2 --rsource -j BAN3
-A ATTACKED2 -j BAN2

-A ATTACKED3 -m recent --rcheck --name BANNED4 --rsource -j BAN5
-A ATTACKED3 -m recent --rcheck --name BANNED3 --rsource -j BAN4
-A ATTACKED3 -j BAN3

-A ATTK_CHECK -m recent --update --seconds 3600 --hitcount 31 --name ATTK --rsource -j ATTACKED3
-A ATTK_CHECK -m recent --update --seconds 600 --hitcount 11 --name ATTK --rsource -j ATTACKED2
-A ATTK_CHECK -m recent --update --seconds 60 --hitcount 6 --name ATTK --rsource -j ATTACKED1
-A ATTK_CHECK -m recent --set --name ATTK --rsource
-A ATTK_CHECK -j ACCEPT

-A BAN1 -m limit --limit 5/min -j LOG --log-prefix "IPTABLES (Rule BANNED-30m): " --log-level 7
-A BAN1 -m recent --set --name BANNED1 --rsource -j DROP

-A BAN2 -m limit --limit 5/min -j LOG --log-prefix "IPTABLES (Rule BANNED-2h): " --log-level 7
-A BAN2 -m recent --remove --name BANNED1 --rsource
-A BAN2 -m recent --set --name BANNED2 --rsource -j DROP

-A BAN3 -m limit --limit 5/min -j LOG --log-prefix "IPTABLES (Rule BANNED-1d): " --log-level 7
-A BAN3 -m recent --remove --name BANNED2 --rsource
-A BAN3 -m recent --set --name BANNED3 --rsource -j DROP

-A BAN4 -m limit --limit 5/min -j LOG --log-prefix "IPTABLES (Rule BANNED-1w): " --log-level 7
-A BAN4 -m recent --remove --name BANNED3 --rsource
-A BAN4 -m recent --set --name BANNED4 --rsource -j DROP

-A BAN5 -m limit --limit 5/min -j LOG --log-prefix "IPTABLES (Rule BANNED-1mo): " --log-level 7
-A BAN5 -m recent --remove --name BANNED4 --rsource
-A BAN5 -m recent --set --name BANNED5 --rsource -j DROP
Explanations
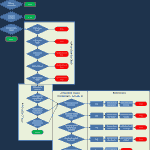
The majority of the rules build logically of the previous set of rules. For explanations of the basic rule set, see the previous article. For a visual representation, I threw together a flowchart in an attempt to depict the rule set [Image 5]. The modifications are explained below:
-A INPUT -m state --state RELATED,ESTABLISHED -j ACCEPT
This was neglected in the original draft of the previous article – it helps to save a bit of processing power (automatically accepting previously established connections instead of further processing them), and helps to not disconnect a session that was valid, just because another session exceeded the limit (helpful if you are testing).
-A INPUT -p tcp -m multiport --dports 21,22,25,110,143 -m recent --rcheck --seconds # --name BANNED# --rsource -j DROP
The difference here is that attackers are now added to one of 5 lists (BANNED1 – BANNED5), new packets are checked against each list – with a differing time. For example, if an entry is in BANNED3, no connections are permitted (on the specified ports), for 1 day (86400 s).
-A ATTK_CHECK -m recent --update --seconds # --hitcount # --name ATTK --rsource -j ATTACKED#
The ATTK_CHECK chain, now jumps to one of 3 ATTACKED chains depending on which rate triggers the jump.
-A ATTACKED# -m recent --rcheck --name BANNED# --rsource -j BAN#
If we make it to an attack chain, the user is going to be banned and the packed dropped Each of the rules in the ATTACKED# chains checks the banned lists, and if an entry is found jumps to the next ban list (escalating consequences for repeat offences).
Note that I wanted different minimums for different attack rates, which is why there are now three ATTACKED# chains – the shorter ban lengths are not used for the slower attack types. If the attacker is already in BANNED5 (the maximum ban length), we simply go to that the BAN5 chain (unlike the other levels, where we go to the next level).
-A BAN# -m limit --limit 5/min -j LOG --log-prefix "IPTABLES (Rule BANNED-#): " --log-level 7
The BAN# chain is where the actual action takes place. Firstly we log, and include a prefix – I have also included the ban time. Since I am now using rsyslog instead of the default syslog, the log-level is much less important than the log-prefix.
-A BAN# -m recent --remove --name BANNED# --rsource
This is mostly a cleanup step – trying to keep each attacker listed in only one ban list.
-A BAN# -m recent --set --name BANNED# --rsource -j DROP
Finally, we add or update the entry in the appropriate ban list, and drop the packet.
Logging Bans with rsyslog
As mentioned a few times above, I have switched from using the default syslog to rsyslog. Many distributions ship this as the default, and others have made it available in their repositories – it is a drop-in replacement for syslog but with quite a few useful additions. The following is for rsyslog (see ‘Upgrading syslog to rsyslog‘ for information on changing syslog).
Edit /etc/rsyslog.conf and add the following at the top of the listed rules:
:msg, contains, "IPTABLES" /var/log/iptables.log
& ~
(Note: while ‘startswith’ should work (instead of ‘contains’), I found that it didn’t, presumably an extra character is included at the start of the message).
Restart rsyslog:
service rsyslog restart
A new file should have been created at /var/log/iptables.log
Setting up Logrotate
Since, there is a good chance that the iptables log will grow considerably, it is probably advisable to setup logrotate to compress and rotate the logs periodically. I have set it up in the following way:
Add the following to /etc/logrotate.d/iptables:
/var/log/iptables.log {
    weekly
    missingok
    notifempty
    compress
    delaycompress
    minsize 1M
    create 0600 root root
    rotate 10
}
You can check your config file, by running the following:
logrotate -d /etc/logrotate.d/iptables
Which should output something similar to the following:
reading config file /etc/logrotate.d/iptables
reading config info for /var/log/iptables.log
Handling 1 logs
rotating pattern: /var/log/iptables.log  weekly (10 rotations)
empty log files are not rotated, only log files >= 1048576 bytes are rotated, old logs are removed
considering log /var/log/iptables.log
log does not need rotating
Notifications with Logwatch
Logwatch already has the capability to parse logged iptables messages, however, it is not probably pointed at the correct file. On Amazon’s Linux, the relevant file is located at /usr/share/logwatch/default.conf/logfiles/iptables. Edit this file, setting the values as below:
LogFile = iptables.log
Archive = iptables.log-*
You can see what the output of logwatch will be by running:
logwatch --service iptables --range yesterday --detail med --print
Given the added complexity of this new rule-set, I was pleased to note that CPU usage remained nominal. However, I do believe, that for any additional complexity, an implementation such as pam_shield (which does have rules that can be customized) would be preferable. For my setup, however, SSH is not authenticated through PAM, and I do not feel like changing the setup to use PAM, so I will be sticking with IPTables.
I’ve now subscribed to your RSS feed… this is some great information… thanks a lot! One question: do you know if there is a way to have the “recent” module save its state when iptables is restarted?
Good to hear you found it useful (and thanks for subscribing). Offhand, I don’t know of any built in way of saving the recent data. The data is accessible from /proc/net/xt_recent – with each file corresponding to one of your chains. You can copy that data to another location if you wish. Restoring it might be harder though – I don’t think you can simply copy it back (haven’t tried, just guessing here). If the data can be restored, then it would be a simple matter to add the appropriate calls into your init script. If you have any luck restoring the data, I’d love to hear about it. (You might have some luck asking on ServerFault).
You can write a script to read from /proc/net/xt_recent and save the IPs listed to a temporary file that will surive reboot. Then add the IPs back in using echo +ip.addr /proc/net/xt_recent/CHAINNAME
from man iptables:
echo +addr >/proc/net/xt_recent/DEFAULT to add addr to the DEFAULT list echo -addr >/proc/net/xt_recent/DEFAULT to remove addr from the DEFAULT list echo / >/proc/net/xt_recent/DEFAULT to flush the DEFAULT list (remove all entries).Great idea – thanks for the tip.
Brilliant!
Thanks for the clear and complete explanation. All the way from the kernel module to the logwatch configuration!
I guess I find a typo. Please search for this in your article:
That rule is included twice. I think the second time should be replaced by:
Thanks again,
Mauro.
Thanks for pointing that out – you’re absolutely right, that is a definite typo. (For curiosity sake, I checked the actual ruleset that I currently use, and it doesn’t have that line at all – I guess that’s one of the failings of this site – I rarely get around to updating older articles). Looking over some of the lines, all the ones with
-A ATTACKED# -m recent –rcheck –name BANNED5 –rsource -j BAN5are redundant. It should never be possible for a request to already be in BANNED5 and make it to the check (it should be dropped at the very start). That said, it also shouldn’t have any adverse effect keeping the line in. I have updated the ruleset to reflect that change. Thanks again, glad you found it useful.Great source of knowledge.
Thanks for sharing with us.
Glad you found it useful, thanks for commenting.
I had been using your original settings with some success but then found that some persistent attacks still got access. I then decided to try these updated settings but couldn’t get them to work. I checked every line with the original and could find no discrepancies. Finally I found that the maximum value for –hitcount on my system (Debian Squeeze) is 20, not 31 as in your settings. Once I reduced the hit count it was accepted by iptables.
Glad to know you had some success with it and managed to get it working. If you want to use 31, the section entitled ‘Prerequisite’ details how to change the limit from 20.
I came here randomly via google I have to say this is one of the most thought out explanations of ip tables I’ve seen (and I’ve seen a lot!). Thanks for taking the time and being so thorough
Glad you found it useful. Thanks for reading and commenting.
I would also recommend setting
ip_list_totalin thext_recentmodule parameters to something big like 10,000. The default on my system (debian, arm) was 100 entries. That means that the first 100 ip’s that fell into the naughty bin get banned, and then ip’s start falling out of the filter. I found this out while stopping a big spam attack from hundreds of hosts, the spam wasn’t stopping even with the filter I built in place because there were more than 100 attacking machines. I imagine the tradeoff for setting this number really high is ram/cpu use.Great idea – just to clarify the parameter is
ip_list_tot. It is definitely something people would want to alter under many circumstances. For reference, it is possible to check the available parameters for thext_recentmodule by running:It is possible to read those values by doing:
Just checked on one of my systems (Amazon Linux), and the default for
ip_list_totis also 100Perfect! Fantastic article! I reached almost half way of it on my own and now I have found you just by chance. It looks like as if I was reading your mind on a distance and following your steps without having any foggiest ideas that you did it much earlier and much better. I will try it now and continue my implementation based on your examples. Many thanks for sharing! Had to get back to the drawing board again after quite a few years of having it all tuned up, but recently I’ve started noticing that some actually began “getting through under the radar”.
Hi
Your settings have worked fine until recently. Now intruders who fail SASL authentication in Postfix are not being blocked and I’m wondering what might be wrong. Any ideas?
Solved it. Using the exccellent xt_recent_parser (https://github.com/peppelinux/iptables_xt_recent_parser) I have been able to adjust the frequencies in the ATTK_CHECK statements to match the rate of attempted SASL authentications. Whilst the frequency of attack is very low (just a few each hour), over a 24 hour period this still adds up to several thousand attempts spread over a number of IP addresses.