It is quite unfortunate that one only has a finite number of hours to dedicate to learning new things, for inevitably there are things we skim over, or worse yet, don’t even know exist. Today, as I was looking for efficient ways of implementing server push for a project of mine, I came across NodeJS. After wrapping my head around the idea of a JavaScript based server, I decided that I had to try it out. The end result is that I think it is a great new server technology and I look forward to deploying (in parallel with my existing LAMP stack) in the near future (quite possibly with MongoDB).
Firstly, perhaps a step back – why bother with a new server technology? My current setup (Nginx as a reverse proxy to Apache (running PHP (FastCGI)) – is quite fast – the problem, however, from past experience, is that maintaining an open connection from many clients to apache quickly consumes all the available server resources and brings everything to a standstill. The reason being that new processes with significant overhead are spawned for each connection, and only a (relatively) small number of connections can be open at any one time. NodeJS attempts to resolve this by only allocating a small heap to each connection (without spawning new threads) and avoiding blocking, which in theory means that it can sustain many simultaneous connections with minimal strain on the server.
Update: You can get up to date binaries (RPMs) for EL6 from http://nodejs.tchol.org/ – easily setup as a yum repository (although, you will have to edit /etc/yum.repos.d/nodejs-stable.repo replacing $releasever with 6, since /etc/yum.conf defines releasever=latest).
(The system used in the rest of the article is t1.micro AWS instance, running Amazon’s Linux (32 bit))
Installing NodeJS
Since the amzn repository does not have NodeJS, the easiest option is to compile from source. Given the fact that this is an actively evolving project, this is probably the best way to go even if binary copies are available.
sudo -i
cd /usr/local/src
wget http://nodejs.org/dist/node-v0.4.1.tar.gz
tar -xzvf node*.tar.gz
cd node*
./configure (4s)
make (23m32s)
make install (1s)
exit
(Values in brackets, for the last 3 lines are execution times) I was quite surprised at how long it took to compile – considerably longer than other sources I have recently worked with. When complete, NodeJS will be installed to /usr/local/bin/node. If desired, it can be added to your path (environmental variable).
Starting NodeJS
At this point I created a test script, based on the ‘Hello World’ example provided by NodeJS. I simply removed the delay to have a starting point:
/var/www/html/example.com/nodejs/test.js:
var sys = require('sys'),
http = require('http');
http.createServer(function (req, res) {
res.writeHead(200, {'Content-Type': 'text/plain'});
res.write('Hello World');
res.end();
}).listen(8001);
You can run this script through NodeJS directly, or use some form of init.d script (or daemonize NodeJS, etc). For this simple test, I just ran it directly, although most recommendations suggest using it with Monit, Upstart, and/or Daemon Tools for longer term stability.
(What appears to be a functional init.d script for Amazon’s Linux can be found at: https://gist.github.com/757965 )
To start the script directly, you can run the following:
sudo -u USERNAME /usr/local/bin/node /var/www/html/example.com/nodejs/test.js &
To stop the above script, run:
/usr/bin/pkill -f '/usr/local/bin/node /var/www/html/example.com/nodejs/test.js'
Running the script as a limited user is simply for security; the ‘&’ at the end is to run the task in the background.
You can verify that node is running by looking at the output of:
ps -ef | grep node
You can check to see what port your node script is listening on by running:
netstat --tcp --listening --numeric-ports --programs | grep node
NodeJS through nginx
As mentioned above, I already use nginx as a reverse proxy for apache (nginx serves all the static files, and proxies requests for php scripts to apache). As such, no installation of nginx was necessary, although I have documented my setup previously.
A couple of quick points of mention – firstly, I tend to create one configuration file per domain (including all its subdomains), but for this test created a configuration file on its own; secondly, since every ‘server’ I have setup through nginx proxies to apache, I have default proxy options already established and included in my main nginx.conf.
The proxy lines I use are:
proxy_set_header        Host              $host;
proxy_set_header        X-Real-IP         $remote_addr;
proxy_set_header        X-Forwarded-For   $proxy_add_x_forwarded_for;
cd /etc/nginx/sites-enabled
example.com.nodejs.conf:
upstream nodejs_app {
     server 127.0.0.1:8001;
     server 127.0.0.1:8001;
}

server {
     server_name  nodejs.example.com;
     access_log  /var/www/html/example.com/logs/nodejs_nginx_access.log;
     error_log  /var/www/html/example.com/logs/nodejs_nginx_error.log;

     location / {
          proxy_pass http://nodejs_app/;
          proxy_redirect off;
     }
}
The purpose of the repeated server entry in the upstream list is essentially to provide a ‘second chance’ – if the first try doesn’t succeed, it will try the second server. Nginx ignores max_fails and fail_timeout values when only a single server is listed (otherwise, those options would be better suited).
service nginx reload
You should now be able to navigate to the ‘nodejs’ subdomain and view the output ‘Hello World’. (Keep in mind that accessing it in this way is through nginx – and as fast as that is, there is some associated overhead – meaning it should be slower than accessing NodeJS directly.)
To access NodeJS directly, you would have to goto port 8001 – of course, you will need to open that port before being able to go there.
Benchmarks
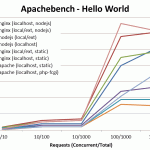
As with any new setup, there are the obligatory apachebench (ab) results. While not the most representative, they are easily implemented and are commonly used.
Apachebench results were generated with variations on the following (for local/ext):
ab -n 10 -c 1 http://nodejs.example.com/
and variations of the line below (for localhost):
ab -n 10 -c 1 -H 'Host: nodejs.example.com' http://127.0.0.1:8001/
Remote tests were run on a Windows 7 box – and really didn’t do too well.
My results are as follows:
|
Time per Request (ms) [Requests: Concurrent/Total] |
|||||
| Target | 1/10 | 10/100 | 10/1000 | 100/1000 | 100/10000 |
| nginx (localhost, nodejs) | 0.55 | 4 (0.40) | 4 (0.42) | 40 (0.42) | 52 (0.53) |
| nginx (local/ext, nodejs) | 1.86 | 6 (0.62) | 7 (0.73) | 58 (0.60) | 61 (0.62) |
| nodejs (local/ext) | 1.67 | 5 (0.51) | 6 (0.56) | 45 (0.48) | 49 (0.49) |
| nodejs (localhost) | 0.44 | 3 (0.30) | 3 (0.26) | 24 (0.25) | 27 (0.27) |
| nginx (local/ext, static) | 1.47 | 2 (0.22) | 2 (0.22) | 19 (0.20) | 19 (0.20) |
| nginx (localhost, static) | 0.17 | 2 (0.16) | 2 (0.20) | 16 (0.17) | 15 (0.16) |
| apache (localhost, static) | 0.28 | 2 (0.23) | 2 (0.23) | 21 (0.23) | 37 (0.37) |
| apache (localhost, php) | 0.76 | 5 (0.56) | 6 (0.59) | 66 (0.69) | 61 (0.62) |
| nginx (remote, nodejs) | 168 | 830 (87.2) | 915 (92) | 10256 (106.9) |
—- |
| nodejs (remote, nodejs) | 170 | 831 (87.9) | 1437 (144.7) | 12249 (127.6) |
—- |

Notes:
- All values are the mean result, in milliseconds (ms)
- The columns are Requests (Concurrent/Total)
- Values in brackets are the mean result across all concurrent requests
- nginx/nodejs/apache means a connection directly to nginx/nodejs/apache
- localhost means that the script was accessed on the loopback interface
- local/ext means that the script was accessed from the local machine, via the external IP address
- static means that a textfile containing ‘Hello World’ was served
- remote means apachebench running on my computer at home, connecting to the server over the internet
- php means that a php file that output a text header and ‘Hello World’ was served (via FastCGI)

-
<?php
header ("Content-Type: text/plain");
echo "Hello World\n";
?>
-
Concluding Remarks
While I don’t see this replacing Apache/PHP anytime soon, it is likely something that has the potential to work well in tandem with the traditional LAMP stack (probably with a NoSQL DB as well). Initial benchmarks look good – coming in a good bit faster than PHP for a simple output. In the above tests, CPU and memory usage stayed low, until the 100 concurrency level, which saw a noticeable, albeit short-lived, spike in CPU usage.